It's hard to believe a year has gone by since I wrote my first article for Edible Magazine. I really love writing Stone's Soup Corner, I get ideas from my editor and we form fun stories for our readers. I never know what I will write about until I find out the "theme" of the magazine, and I like it that way. So I hope you have enjoyed reading these as much as I have enjoyed writing them. I also added some fun photos here that were not used in the magazine, so enjoy.
It's a typical summer play date and the kids are in the kitchen eating juicy strawberries we brought home fresh from the farmers' market. They are loving them, drippy and bursting with strawberry flavor–pure joy. At that perfect moment, we hear a dim jingle. As it gets closer, the kids' ears perk up. It's the ice cream truck! They run to the window as he zooms by, the jingle fading away.

Instantly I get two sad looks, big puppy dog eyes that mean "why can't we have that?" I curse that truck under my breath for distracting the kids from a lovely moment with nature and attempting to convince them that treats only come in cellophane wrappers containing gumballs and blue dye.
In that moment I knew I wanted to do something special for the kids. My first thought–let's make homemade ice cream! On second thought–homemade ice cream is delicious, but it does take a long time with cooking the custard, waiting for it to cool, and making sure the machine is frozen or packing the churn with ice and rock salt. Too much time and effort I decided–the kids want instant gratification anyway, the truck is long gone and they now have sugar on the brain. I've lost them. So, I thought, do I use this as an opportunity to talk to them about the importance of knowing where your food comes from and what is in it, or just try to have a good time with them? No one wants to be told that the ice cream truck is a bad thing. Then I remembered that there was a way the kids could actually "hand churn" the ice cream themselves, using a very simple, but delicious, ice cream recipe! So, I say "geez, he always drives so fast down our street, we'll never catch him. How about we make our own ice cream? Let's use those strawberries!"
After all the cheering subsided, I gave each of them an egg slicer and a bowl of strawberries and set them to work slicing while I measured the rest of the ingredients. They would do the actual churning themselves!
 This is where we live today, in between two worlds. One full of fresh, natural foods and the other full of processed, manufactured foods. How do we strike a balance, educating our kids in the joys of the summer garden and still allowing them the rush of excitement they receive from the ice cream truck? Making treats like this ice cream at home is a great way to start. It doesn't really matter what you make, what matters is that you are spending time together. Teach them the process of transforming a raw ingredient into a finished dish. That is a gift that will last them a lifetime.
HOMEMADE ICE CREAM . . . IN A BAG
Use any fruit you have on hand. Soft fruits like bananas, strawberries and peaches work best if you want the kids to be able to do the slicing using an egg slicer. This is a great use for all those gallonsized zip top bags you've been rinsing out and saving.
Makes 1 serving
INGREDIENTS
1/2 cup organic half-and-half, soy milk, goat's milk or whole cow's milk
1/4 cup fresh orgnic fruit (peeled, diced or chopped, as needed)
1 Tbs sugar
1/4 tsp vanilla
1 sandwich-sized zip top bag
1 gallon-sized zip top bag
3 cups crushed ice
1/3 cup rock salt
TO PREPARE
Place the first four ingredients in the smaller zip top bag and seal. Make sure it is tightly closed! You may want to double bag here for extra insurance against spillage.
Place the ice and rock salt into the larger zip top bag and then insert the small bag with the ice cream mix, snuggling it down inside the ice and salt. Seal the large bag.
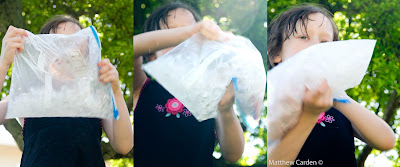
Once you have assembled the bags, squeeze and knead the bags together until the ice cream has frozen–about 10 to 15 minutes. If you are making this with at least a couple of kids (or even one child and yourself), it is fun to stand across from each other and toss the bags back and forth – gently – to get the "churning" process started. They will need to complete the freezing process with the squeezing and kneading. Once the ice cream is frozen, remove the small bag, wipe off the water and salt, unseal it and eat your delicious, homemade ice cream straight from the bag. No need to even dirty a bowl! (Warning:do not empty salty water onto the lawn, it will kill it.)
FUN FLAVORINGS TO MIX IT UP:
Chopped nuts, fresh cherries, chocolate syrup, chopped basil or mint, almond extract, crushed cookies, mini chocolate chips, shredded coconut, chopped dates, a spoon full of jam or jelly, 1/4 teaspoon balsamic vinegar, a spoonful of peanut butter or sunflower butter
Here is a list of some great camps in edible Marin & Wine Country where your kids will learn where their food comes from – and have fun doing it!